


Complete Blade Replacement Guide for VONCI Commercial Barbecue Slicers
Jun 23,2026
7
Barbecue restaurants widely adopt VONCI commercial barbecue slicers. After prolonged use, the blades tend to suffer from edge curling, chipping, inconsistent slicing thickness, and torn or sticky meat slices. These issues not only ruin the presentation of barbecue servings but also hinder operational efficiency. Fortunately, blade replacement can be accomplished with ease by following proper procedures.
Based on the official operating standards for all 10-inch and 12-inch VONCI slicers specially designed for barbecue ingredients, this guide elaborates the full blade replacement workflow across five core modules: pre-replacement safety preparation, standardized removal of old blades, standard installation of new blades, no-load commissioning and testing, as well as long-term maintenance and troubleshooting.
I. Pre-Replacement Safety & Material Preparation
The circular blade of a barbecue slicer is crafted from high-hardness stainless steel with ultra-sharp cutting edges. Carrying out disassembly or assembly without power cut-off or protective gear poses an extremely high risk of lacerations. All handling procedures must strictly comply with the national food machinery safety standard GB22749-2008, and adequate preparation serves as the primary barrier against workplace injuries.
1. Full Power Isolation of the Entire Machine to Prevent Accidental Startup
The very first step of blade replacement is to cut off all power supply completely, rather than merely toggling the start-stop switch on the machine body. First, press the red emergency stop button, turn off the main power switch of the slicer, and unplug the power cord from the wall socket. For restaurants with multiple devices sharing one power strip, unplug the main cord of the strip simultaneously to achieve physical power isolation. After power disconnection, press the start-stop button 3 to 5 times repeatedly to discharge residual electricity stored in the motor’s capacitor. Do not proceed with disassembly until you confirm the cutter head shows no sign of rotation. If you need to step away midway through the operation, take the power plug with you to avoid accidental reconnection by other staff members.
2. Assemble a Full Set of Protective Tools and Consumables
Barbecue ingredients contain heavy grease. Blade disassembly and assembly require both hand cut protection and dedicated cleaning supplies. Direct bare-handed contact with the cutting edge is prohibited. A complete list of required materials is as follows:
First, double-layer thick cut-resistant nitrile work gloves, which must be worn throughout the whole process to shield skin from sharp edges and prevent lacerations caused by chipped old blades. Second, the original matched 4mm hex key. All fixed screws on VONCI barbecue slicer blades are hexagon-type; adjustable wrenches or pliers must not be used for disassembly, as they easily strip screw threads and damage fasteners. Third, food-grade neutral detergent, lint-free cotton rags, and soft brushes to clear congealed barbecue grease and frozen meat residue trapped in gaps of the cutter holder and spindle. Fourth, brand-new original VONCI blades exclusively for barbecue use. Generic non-original blades from other brands are strictly forbidden, since they differ from standard deli slicer blades in thickness and central positioning hole layout, leading to unbalanced rotation and severe vibration at high speeds. Fifth, a sealed stainless steel sharps container for storing discarded blades. Never throw used blades into regular trash bins to avoid accidental cuts to cleaning staff. Sixth, food-grade anti-rust lubricating petroleum jelly, applied to spindle positioning posts to reduce friction noise during blade rotation and prevent metal jamming due to rust.
3. Preprocessing of the Work Area and Equipment
Roll the VONCI barbecue slicer to a spacious, flat workbench. Remove the meat pusher baffle, pressure bracket, ingredient tray, and side sharpening stone assembly. Clear all frozen meat rolls, packaging bags, tools and sundries off the countertop to ensure unobstructed access for disassembly work. Place anti-slip rubber mats under the slicer base to stop the machine from sliding or tipping over during handling. Keep children and irrelevant personnel away from the operation zone to avert accidental contact with the exposed cutter head.
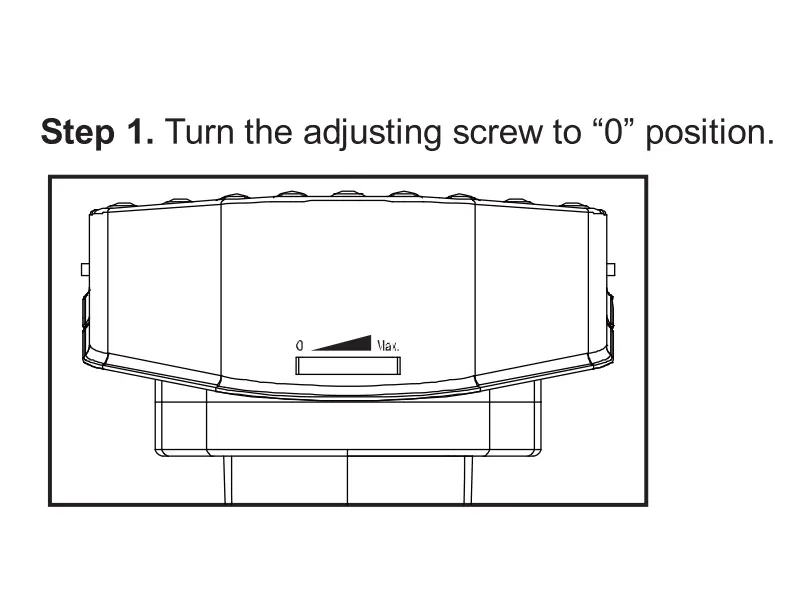
Turn the slicing thickness adjustment knob on the right side of the machine to the minimum 0mm setting. Release the buckle of the front meat pusher bracket and fully remove the pressure feeding assembly to fully expose the cutter head and the curved blade safety guard. Flip up the side sharpening stone unit, fasten its locking buckle upward, and move the sharpening stone away from the blade handling zone to prevent hard abrasive surfaces from scratching brand-new blades.
II. Standard Steps to Dismantle the Old Blade of VONCI Barbecue Slicers
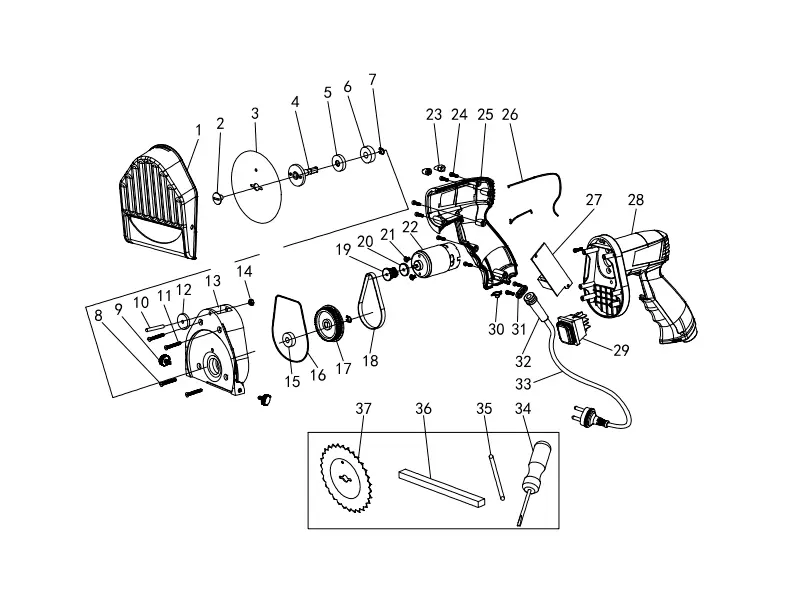
VONCI barbecue slicer blades adopt a four-hole diagonal fixing structure centered on the spindle, with an integrated cutter head and motor spindle. Disassembly must follow the standardized sequence: remove the safety guard first, loosen fixing screws diagonally in batches, then take out the blade smoothly from the rear. Prying the blade hard from the front is forbidden, as blade fragmentation may cause severe cuts to operators.
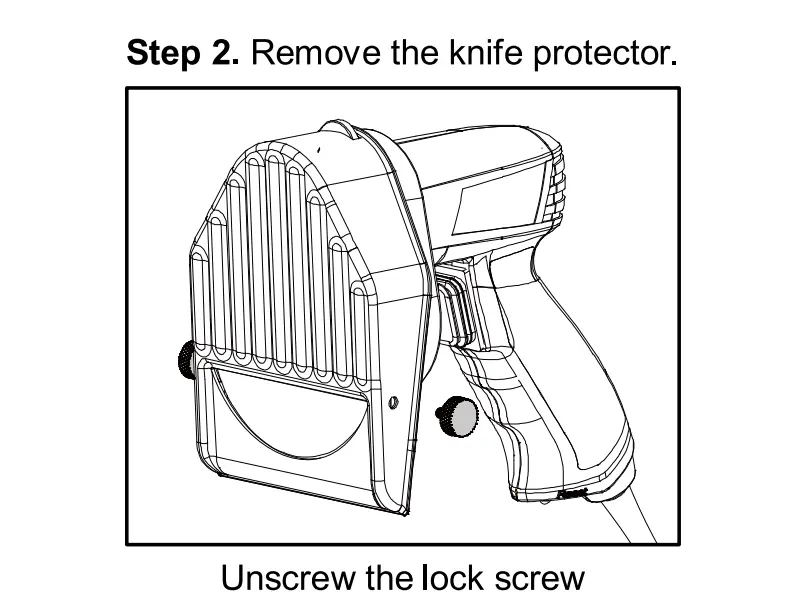
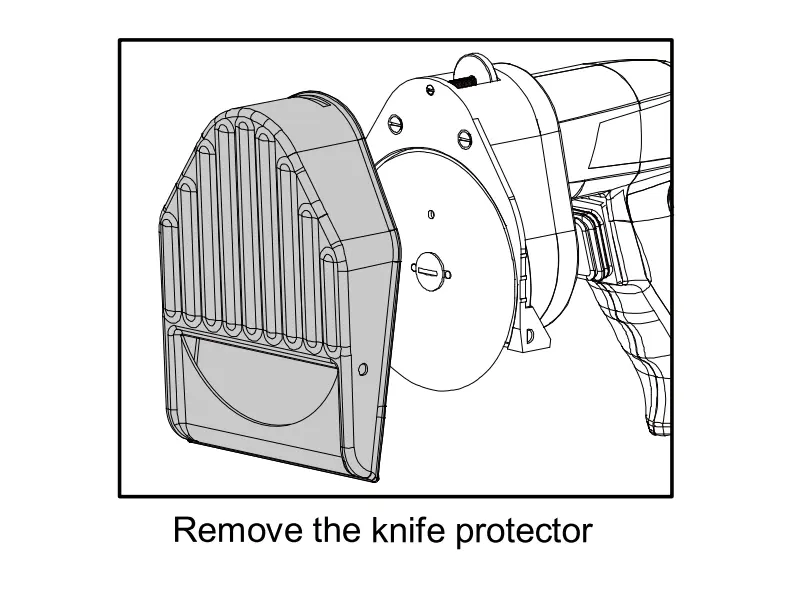

Step 1: Remove the curved blade safety guard. The guard covers most of the cutting edge and is secured by a hand-tightened nut on the rear side. Put on cut-resistant gloves, rotate the nut counterclockwise to remove it, then pull the guard outward gently to take it off. Place the guard on the inner side of the workbench to avoid rolling, collision and deformation. The inner surface of the guard accumulates solidified barbecue grease and tiny meat debris all year round; wipe it thoroughly with warm water mixed with food-grade detergent and set it aside to dry for later reinstallation.
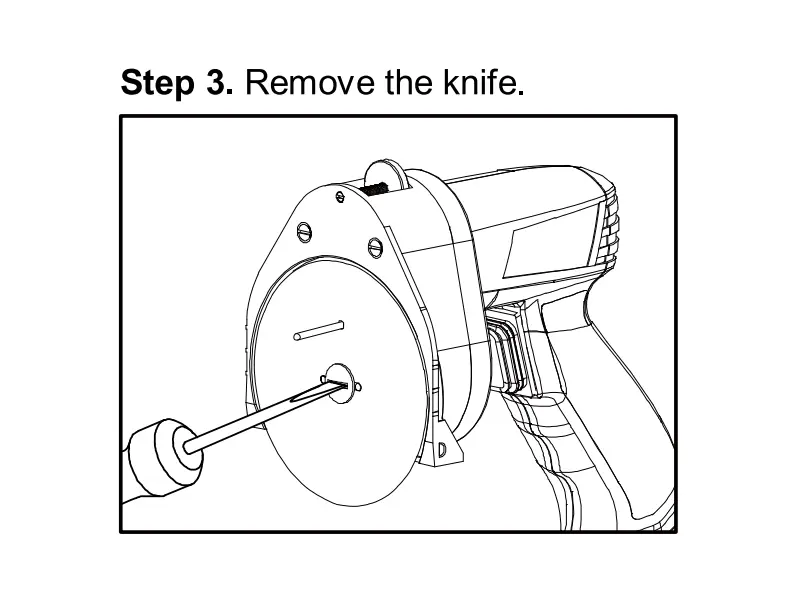
Step 2: Loosen the four blade fixing screws diagonally in batches. Align the hex key with the four fixing screws on the back of the blade and loosen them in the factory-specified diagonal order: top left, bottom right, top right, bottom left. Turn each screw only 2 to 3 full rotations. After all screws are slightly loosened, take out each screw, metal flat washer and spring lock washer one by one, and store them neatly on a clean tray to avoid loss. Never fully unscrew a single screw at one time. Unilateral stress will warp the circular blade, resulting in poor adhesion to the cutter head and violent vibration once the machine is powered on.
Step 3: Take out the worn barbecue blade smoothly. After all screws and washers are removed, hold only the thick spine of the blade with both hands and keep clear of the sharp cutting edges at all times. Push the central positioning hole of the blade inward gently from the machine’s rear side. Once the blade separates from the spindle positioning posts, slide the entire circular blade outward slowly. Old blades used for cutting frozen meat feature invisible micro-chips along edges, even if they appear intact to the naked eye; never touch the cutting edges with fingers. Immediately seal the discarded blade in the dedicated sharps container upon removal, complying with waste disposal regulations for food safety in catering establishments.
Step 4: Deep clean the positioning surface of the cutter holder spindle. After blade removal, congealed frozen grease and fine meat scraps build up in gaps around the cutter head, four spindle positioning posts and screw holes. Residual contaminants create gaps between the new blade and cutter head, leading to inconsistent slicing thickness. Clean all metal contact surfaces thoroughly with warm water and soft brushes, and wipe them completely dry. Apply a thin layer of food-grade petroleum jelly to the spindle positioning posts to reduce wear of the new rotating blade. Meanwhile, inspect the spindle for scratches or deformation. If the spindle suffers severe wear, replace its matching accessories at the same time; otherwise, the new blade will vibrate continuously at high speed and damage the motor bearings.
III. Standard Installation Process for New Barbecue Blades
Proper blade installation directly determines slicing uniformity and equipment operation safety. Three critical factors must be strictly controlled: distinguishing the blade’s front and reverse sides, appropriate screw tightening torque, and full flat adhesion. Improper installation triggers heavy machine vibration and uneven meat slices. In extreme cases, the blade may fly off at high speed, posing severe safety hazards.
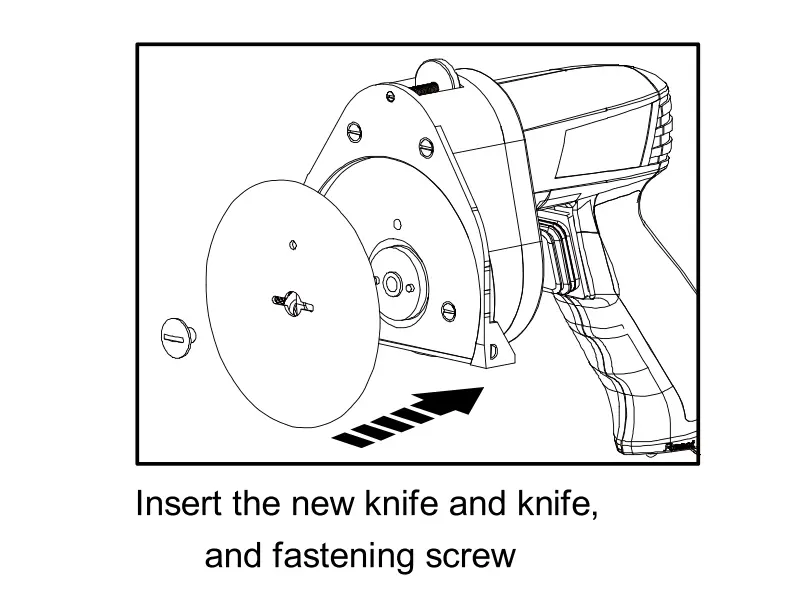
Step 1: Differentiate the blade’s two sides and align with spindle positioning posts accurately. One side of the dedicated VONCI barbecue blade has a sloped cutting edge, while the opposite side is a smooth, edgeless back. The smooth back must fit tightly against the cutter head spindle, with the cutting edge facing the meat pusher bracket that feeds ingredients. Fit the blade onto the four spindle positioning posts and align all four screw holes perfectly. Press the blade lightly and check visually that no gaps, warping or angular offset exist between the blade and cutter head. If the holes are slightly misaligned, do not force the blade into place; adjust its angle to realign. Forcible compression induces internal stress cracks that may rupture during high-speed rotation.
Step 2: Tighten fixing screws diagonally in multiple stages. Retrieve the flat washers and spring lock washers stored during disassembly and slide them onto the hex screws in sequence, with spring lock washers pressed against the blade’s metal surface. Adopt the diagonal tightening method and fasten screws gradually in three rounds: in the first round, apply light tension to all four screws just enough to hold the blade steady without wobble; in the second round, apply even force to eliminate tiny gaps between the blade and cutter head; in the third round, tighten moderately and stop immediately once resistance is felt. Excessive brute force tightening is prohibited, as extreme screw pressure warps the circular blade, triggering violent machine vibration under high-speed operation and increasing motor load drastically.
Step 3: Recheck the flat adhesion of the blade. After fully tightening all four screws, wear cut-resistant gloves and rotate the cutter head spindle manually for a complete full circle. Observe throughout the rotation that the blade stays fully attached to the cutter head without local warping or obvious gaps. Run your fingers lightly around the outer rim of the blade to confirm no protrusions or looseness, and that the tops of all four screws sit at an identical height with no uneven offsets. If part of the blade lifts off, loosen the corresponding diagonal screws and adjust washer thickness to guarantee even stress distribution across the full blade circumference.
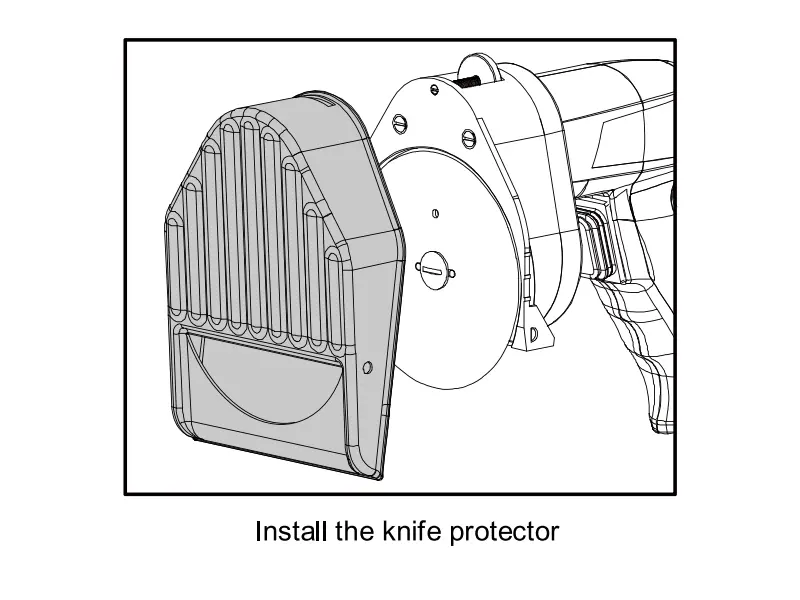
Step 4: Reinstall the safety guard and all matching machine components. After inspecting and securing the blade, fit the curved metal safety guard back into position and tighten the rear hand-tightened nut clockwise. The guard must enclose the vast majority of the cutting edge, leaving only a narrow gap for normal slicing. Reset the side sharpening stone unit and fasten its locking buckle downward. Reattach the meat pusher bracket and ingredient tray one after another, and lock the buckle of the slicing thickness adjustment baffle to restore the machine to its operational configuration for daily service.
IV. No-Load Debugging and Barbecue Slicing Test Post Blade Installation
The slicer cannot be put into formal barbecue production immediately after blade replacement. Two debugging procedures — no-load trial run and barbecue ingredient slicing test — must be carried out to confirm zero vibration, abnormal noise and consistent slicing thickness before serving customers, avoiding mid-service equipment breakdowns that delay food preparation.
1. Low-Speed No-Load Trial Run to Check Vibration and Abnormal Noise
Confirm the power plug remains disconnected, then rotate the cutter head manually 3 to 5 times to ensure smooth rotation without jams or metal friction noise. Next, plug in the power cord and turn on the machine switch for a 30-second no-load run.
Operators must stand beside the machine instead of facing the blade area directly, and observe vibration intensity. Brand-new blades generate only minimal vibration during no-load operation. If the whole machine shakes violently, cut off power instantly, then disassemble and reinspect whether the blade is installed backwards, whether screws are tightened evenly, and whether meat residue or foreign objects remain on the cutter holder. Meanwhile, listen to the running sound; operation without harsh metal friction noise qualifies as normal. If shrill abnormal noise occurs, fine-tune the guard’s fixing nut to create a tiny clearance and prevent the guard from rubbing against the blade.
2. Barbecue Ingredient Slicing Test to Calibrate Slicing Thickness
Select thawed beef brisket rolls at room temperature as test material, adjust the slicing thickness to the commonly used 1.5mm setting for barbecue, and feed ingredients for trial slicing. Qualified finished slices must be intact, uniform, burr-free, free of unilateral thickness deviation, and free of tearing or sticking. If slices display uneven thickness on two sides, the blade is not attached flatly; cut off power and retighten screws diagonally to readjust adhesion. If meat slices stick together and the cut surface looks rough, activate the side sharpening stone to grind the cutting edge for 10 seconds to boost sharpness. Cut off power after the slicing test, and recheck that the safety guard, meat pusher bracket buckles and blade fixing screws are all fully locked with no missing protective components.
V. Common Mistakes, Troubleshooting and Long-Term Maintenance for Blade Replacement
(I) Frequent On-Site Disassembly Mistakes and Their Safety Hazards
First, handling blades with bare hands during disassembly and assembly causes 90% of laceration injuries in restaurants; cut-resistant gloves must be worn at all times. Second, fully tightening a single screw at once warps the blade, leading to unbalanced high-speed rotation and persistent vibration that wears motor bearings. Third, using non-original generic barbecue blades creates safety risks of flying blades due to mismatched hole layouts and hardness. Fourth, installing new blades without cleaning grease and residue on the cutter holder traps contaminants between layers, tilting the blade and resulting in uncontrollably uneven barbecue slices. Fifth, starting the machine without the safety guard leaves exposed sharp edges that easily cut operators, violating food processing machinery safety regulations.
(II) Quick Fixes for Common Malfunctions After Blade Replacement
Severe machine vibration: Retighten all screws evenly in diagonal order, clear foreign matter on the cutter holder, and verify whether the blade is installed backwards;
Uneven thickness on one side of barbecue slices: The blade fails to attach flatly; add or remove washers to adjust the fit of positioning holes;
Shrill metal noise during operation: The safety guard rubs against the blade; fine-tune the rear fixing nut to reserve a tiny clearance;
Sticky and torn meat slices: The new blade edge is unsharpened; use the sharpening stone to grind the cutting edge briefly.
(III) Long-Term Blade Maintenance to Extend Replacement Intervals
Remove the blade and cutter holder daily after closing barbecue service, wash all grease off with warm water, and reassemble only after complete drying to avoid metal rust and grease buildup. Do not cut hard frozen ingredients or bone-in meat, as hard materials chip cutting edges rapidly and drastically shorten blade service life. Grind the blade weekly with the sharpening stone to maintain sharpness and reduce replacement frequency. Restaurants should keep one original barbecue blade as spare stock to enable fast replacement in case of sudden blade chipping without delaying barbecue order preparation. For long-term storage during restaurant shutdowns, coat the blade thinly with food-grade anti-rust petroleum jelly, fasten the safety guard, and store the slicer in a dry, well-ventilated space.
While blade replacement for VONCI commercial barbecue slicers seems straightforward, it involves multiple personal safety codes and precise assembly requirements. The four core steps — full power isolation, cut protection, diagonal disassembly and assembly, and flatness debugging — are all indispensable.
